

One craft that I love to dabble in is candle making! Now, I burn a TON of candles. A ton. I love the warmth, the smells, and the ambiance they create. So needless to say, I go through a lot of candles. And nowadays, the decent sized scented ones can be upwards of $25 each at the store! So in addition to candle making being a new craft that I wanted to try out, I figured that this could also be a way to save a few dollars (after the initial purchasing of all of the materials). And the great thing is, you can find all of the materials online and or at your local craft store and you can do it right in your kitchen.
After a lot of research (and a lot of trial and error), I’ve found a simple, and consistent way to make great smelling, natural soy candles that I want to share with all of you.
Here’s what you’ll need (with some links to the products I use):
Old Saucepan (I wouldn’t use any really nice cookware you own, just because you never know with crafts. Pick one up at a local thrift store)
Soy wax flakes (I buy these in bulk because it’s a bit cheaper)
Containers for your candles (I use a lot of glass and tin containers but you can really pour a candle into a ton of different vessels, get creative!) Also, pro tip: Once you burn down a store bought candle completely, save the jar. It’s easy to use a spoon to scrape the little wax left and the wick bottom into the trash. Bonus points for recycling. :)
A hot glue gun (to glue down the wicks in the containers)
Essential oils - About 1 ounce/batch (You can buy the smaller bottles of essential oils, but they don’t go as far when making batches of candles, I have found. Here, I’ve linked to a brand on amazon that does larger bottles that each contain enough for about 4 batches)
Pencils/Popsicle sticks/clothespins or wick bars (Anything you can use to hold your wicks up straight in the center of the candle)
Scissors (to trim the wicks)
A kitchen scale for measuring out the wax flakes (This is optional, but I’m a little extra and prefer to buy the flakes in bulk and then measure 1 lb. of wax into zip lock bags right when I get the wax so that when I decide to make candles the 1 lb. baggies are ready to go.)
How to make the candles:

My double boiler set up. You can see my first batch of candles hardening on the left.
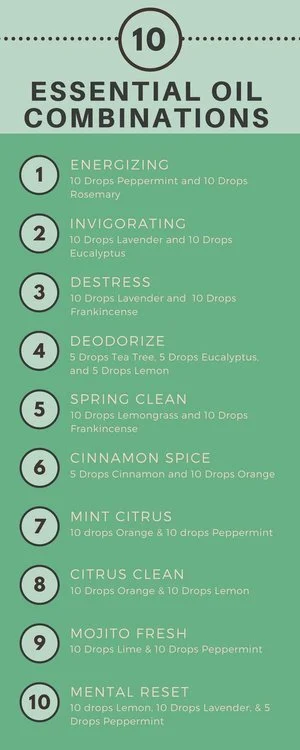
10 awesome essential oil combinations to try in your candles.
First, plug in your hot glue gun so that it can warm up while you set up a double boiler situation on your stove top. Fill your old saucepan about 1/4 full with water and place on the stove. Turn your stove up to high. Then you’ll want to take your heat-resistant pouring pitcher and add 1 lb. of the soy wax flakes into it. Then place the pouring pitcher into the saucepan with the handle over the outside of the pan.
The water will eventually boil and your wax will begin to melt. You’ll want to stir the wax a bit as it melts and also try to break up some of the larger chunks of wax so that they melt quicker. Once the wax is almost entirely liquefied, stick your cooking thermometer into the hot wax and let it sit in there as it continues to heat.
Heat the wax until it reaches 185 degrees (Fahrenheit). This is the temperature at which the essential oils will mix in easily, but not burn off entirely.
Once the wax reaches 185 degrees, use an oven mitt to carefully remove the pitcher from the heat. At this point, add in at least 1 oz. (about 2 tablespoons) of your favorite essential oils. You can simply add one type of oil (like lavender), or you can mix oils together to create unique scents. You can see some great combinations and their intended uses (energize, destress, etc.) in the graphic on the right. Note that 1 oz. is the minimum amount you should use to have fragrant candles, but you can add more or less oils as you would like to create a more or less fragrant candle. Stir the essential oils in thoroughly but gently. I usually go about 20 times in each direction.
Let the wax cool to about 135 degrees. At this is the point, during the cooling process, I like to get all of the containers ready to pour the wax into. Take whatever vessel you are making your candle in and take one of your wicks and put a small dab of hot glue on the bottom of the small metal piece at the end of the wick. Then place the wick into the center of the bottom of the vessel and press down firmly to adhere it. If the vessel is tall and skinny and you can’t fit your hand into it, you may need to use a pen to press it down onto the bottom. Make sure to do this relatively quickly so that the glue doesn’t dry before you attach it. The size of the container you choose will dictate how many containers one batch will fill. I always try to have about 3 containers with wicks ready just in case I can fill that many.
When the wax has cooled to 135 degrees, carefully and slowly pour the wax into your prepared vessels, avoiding pouring directly onto the wick. Don’t fill the vessel to the tippy top, you want room for the wax to melt down and pool once you light it. Once you’re finished filling the vessels, you’ll want to secure the wick upright in the center of your vessels using either pencils, popsicle sticks, or whatever you have on hand that you can balance on either side of the wick to hold it upright. You can also invest in wick bars if you desire that are used for this purpose. I have also found that, depending on the size of the top of your vessel, clothespins can be useful for this, as you can actually thread the wick through the small hole in the center and slide it down onto the top of the vessel and it will hold the wick in place. This is an important part of the process because if the wick isn’t centered the candle may burn unevenly.
Now, let your finished candles cool and solidify. It’s best to let them sit overnight to ensure they solidify fully.
In the morning, remove whatever you have holding the wicks up and use scissors to trim the wicks down to about 1/4 inch from the top of the candle.
Congratulations! You’ve made a soy candle! Enjoy :)
If you tried this method and enjoyed it or have comments or ways to improve,
please drop me a comment below!
